This time of year always seems to turn in to a game of pass the produce. Your neighbor has too many tomatoes. Your friend gets extra cucumbers in her CSA. And every week, your co-worker tries to pawn off a basket of his peppers.
There are worse problems to have.
This year, instead of saying no — or continuing to pass the goods down the line to other friends — pick up a new skill for this plethora of produce, and learn to can.
Canning is the next natural extension of our increasing national awareness of eating fresh, healthy and local.
Grandma knew canning could feed her family healthy meals all year long, and what’s old usually becomes new again. Canning — much like knitting (can you believe it?) — is back on the scene.
But between tools, temperatures and safety measures, the age-old practice can leave first-timers at a loss (and wishing Grandma was still around to do the heavy lifting).
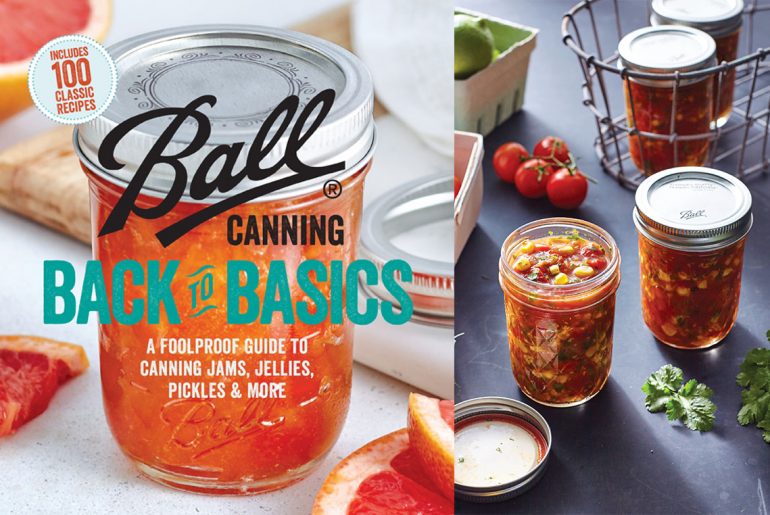
Ball’s latest how-to guide and collection of recipes takes canning Back to Basics.
“We did a lot of research in the past three or four years about the types of recipes people were looking for, and what their concerns were, and what we could do to help people start canning,” said Chef Sarah Page of The Fresh Preserve Test Kitchen.
The resulting book is aimed at someone who has either never canned or hasn’t canned in a very long time. This audience will find the step-by-step photo instructions to be invaluable.
“A lot of learning is visual now,” said Page. “We listened to our consumers and that’s how we came up with the book.”
Ball Canning Back to Basics: A Foolproof Guide to Canning Jams, Jellies, Pickles & More ($16.99, 978-0-8487-5452-5, 192 pages) is divided into six sections: Jams, Preserves and Marmalades; Jellies; Fruit; Fruit Butters and Sauces; Tomatoes; and a whole section for everyone’s favorite: Pickles.
“We started to see people canning more and more, and it has to do with the public wanting to feel better about where their food comes from,” said Page.
“People are feeling less warm and fuzzy about big processed foods. Canning gives them a fun solution to that.”
With all of the health scares and food recalls, uncommon allergies and special dietary needs, it’s a wonder it took us this long to come back to canning. For folks looking to lead a healthy lifestyle, canning is now practically a must.
“Canning is the ultimate control of what you’re eating,” said Page.
Canners never have to say goodbye to those sweet, ripe summer flavors. Here’s a selection of canning recipes from Ball Canning Back to Basics that will leave you salivating until next spring.

HABANERO-APRICOT JELLY
Makes about 6 (1⁄2-pint) jars
This beautiful jelly is great as a spicy-sweet glaze for cooked shrimp or chicken wings, or stirred into mayonnaise to punch up sandwich spreads and dips.
Ingredients
- 11⁄2 cups white vinegar (5% acidity)
- 2⁄3 cup finely chopped dried
apricots - 6 cups sugar
- 1⁄2 cup finely chopped red bell
pepper - 1⁄2 cup finely chopped red onion
- 1⁄4 cup finely chopped seeded habanero pepper
- 1 (3-ounce) pouch Ball® Liquid
Pectin
Directions
- Combine the vinegar and apricots in a medium bowl. Cover and let stand at room temperature at least 4 hours or overnight.
- Stir together the apricot mixture, sugar, and next 3 ingredients in a 6-quart stainless-steel or enameled Dutch oven. Bring the mixture to a full rolling boil that cannot be stirred down, over high, stirring frequently.
- Add the pectin, immediately squeezing entire contents from the pouch. Boil hard for 1 minute, stirring constantly. Remove from heat. Skim the foam, if necessary.
- Ladle the hot jelly into a hot jar, leaving 1⁄4-inch headspace. Wipe the jar rim. Center the lid on the jar. Apply the band, and adjust to fingertip-tight. Place the jar in the boiling water canner. Repeat until all the jars are filled.
- Process the jars 10 minutes, adjusting for altitude. Turn off heat; remove the lid, and let the jars stand 5 minutes. Remove the jars and cool.

HOMEMADE SWEET CHERRY PIE FILLING
Makes 1 (1-quart) jar filling for 1 (9-inch) pie
Select bright, fully-ripe sweet dark cherries, such as Bing.
Ingredients
- 2 pounds dark, sweet cherries, stemmed, pitted, and chopped (about 6 cups)
- ½ cup sugar
- 2 tablespoons lemon juice
- ½ teaspoon ground cinnamon
- ¼ teaspoon almond extract
Directions
- Bring cherries and sugar to a boil in a large stainless-steel or enameled saucepan; reduce heat, and simmer, uncovered, 5 minutes, stirring often. Remove from heat, and stir in the juice and flavorings.
- Ladle the hot fruit mixture into a hot jar, leaving 1⁄2-inch headspace. Remove air bubbles. Wipe the jar rim. Center the lid on the jar. Apply the band, and adjust to fingertip-tight. Place the jar in the boiling water canner.
- Process the jar 30 minutes, adjusting for altitude. Turn off heat; remove the lid, and let the jar stand 5 minutes. Remove the jar and cool.
Tip: Before using fruit pie filling straight from the pantry, you’ll want to thicken it. Drain 1⁄3 cup liquid from 1 jar of Homemade Sweet Cherry Pie Filling into a medium saucepan. Whisk 3 tablespoons cornstarch into the liquid until smooth. Add the remaining contents of the jar to the cornstarch mixture, and stir gently to blend. Bring to a boil over medium-high. Reduce heat and simmer 1 minute.

CORN & CHERRY TOMATO SALSA
Makes about 6 (1⁄2-pint) jars
This tasty salsa will remind you of summer even when there’s frost on the window panes.
Ingredients
- 1 3⁄4 pounds cherry tomatoes, quartered
- 1 cup fresh corn kernels (about 2 large ears)
- ½ cup finely chopped red onion
- 1⁄4 cup fresh lime juice (about 3 limes)
- 3 tablespoons chopped fresh
- cilantro
- 1 teaspoon table salt
- 1 to 2 jalapeño peppers, seeded and minced
Directions
- Bring all the ingredients to a boil in a large stainless-steel or enameled saucepan. Reduce heat and simmer 5 minutes, stirring occasionally.
- Ladle the hot salsa into a hot jar, leaving 1⁄2-inch headspace. Remove air bubbles. Wipe the jar rim. Center the lid on the jar. Apply the band, and adjust to fingertip-tight. Place the jar in the boiling water canner. Repeat until all the jars are filled.
- Process the jars 15 minutes, adjusting for altitude. Turn off heat; remove the lid, and let the jars stand 5 minutes. Remove the jars and cool.
NOTE: The use of fresh lime juice in this recipe is for the purpose of fresh flavor and has been verified as safe by scientific testing.
Also see, Steps for canning your own applesauce.


